DIY Tree: Crafting Nature’s Beauty invites you to explore the enchanting world of creating your own trees. Whether you’re drawn to the artistry of crafting a miniature forest for your home decor, a whimsical centerpiece for a special event, or a unique craft project for children, this guide offers a comprehensive journey through the diverse possibilities of DIY trees.
From the fundamentals of choosing the right materials and designing your tree to mastering advanced techniques and decorating for different occasions, we’ll cover everything you need to embark on your own DIY tree adventure. Get ready to unleash your creativity and bring the magic of nature indoors.
Introduction to DIY Trees
Creating your own trees can be a fulfilling and creative experience. Whether you’re crafting a miniature forest for a diorama or designing a towering centerpiece for a party, DIY trees offer a unique way to express your artistic vision and add a touch of nature to your projects.
The appeal of DIY trees lies in their versatility and adaptability. They can be customized to suit any theme, style, or occasion. From delicate paper trees for festive decorations to sturdy wooden structures for imaginative play, the possibilities are endless.
Types of DIY Trees
DIY trees can be crafted from a wide range of materials, each offering its own unique aesthetic and characteristics.
- Paper Trees: These are a popular choice for crafting, as they are lightweight, easy to work with, and readily available. Paper trees can be created using origami techniques, cut-out designs, or even by simply folding and twisting paper strips.
- Fabric Trees: Fabric trees offer a soft and tactile quality, making them ideal for creating cozy and whimsical decorations. They can be sewn, glued, or even felted into various shapes and sizes.
- Wooden Trees: Wooden trees provide a more robust and durable option, suitable for outdoor projects or sturdy indoor decorations. They can be carved, painted, or assembled from wooden dowels and branches.
- Recycled Materials: Embracing sustainability, DIY trees can be crafted from recycled materials such as cardboard, plastic bottles, or even old newspapers. This adds an eco-friendly touch to your creations.
Materials for DIY Trees

The materials you choose for your DIY tree project will significantly impact the final look and feel of your creation. From the base structure to the decorative elements, each material contributes to the overall aesthetic and longevity of your tree.
Base Materials
The base material provides the foundational structure for your DIY tree. It determines the tree’s size, shape, and stability.
- Wire: Wire is a versatile material for creating tree branches. It can be easily bent and shaped to create realistic branches, and it’s durable enough to support heavier decorations.
- Twigs and Branches: Natural twigs and branches offer a rustic and organic look for DIY trees. They can be gathered from your yard or purchased from craft stores.
- Cardboard: Cardboard is an inexpensive and readily available material that can be used to create the base of a tree. It can be cut and shaped into different forms, and it’s sturdy enough to support light decorations.
- Foam: Foam is a lightweight and pliable material that can be used to create the trunk and branches of a tree. It can be easily carved and shaped to create realistic details.
- Wooden Dowels: Wooden dowels provide a strong and stable base for a tree. They can be easily cut and glued together to create the trunk and branches.
Decorative Elements
Decorative elements add character and visual interest to your DIY tree. These elements can range from simple to elaborate, depending on your desired style and the occasion.
- Fabric: Fabric can be used to create leaves, flowers, and other decorations for your DIY tree. Choose fabrics in various colors and textures to create a unique look.
- Paper: Paper is a versatile material for creating tree decorations. You can use construction paper, tissue paper, or even origami paper to create leaves, flowers, and other embellishments.
- Beads: Beads add sparkle and texture to DIY trees. Choose beads in various sizes, colors, and materials to create a unique look.
- Ribbons: Ribbons can be used to add a touch of elegance and color to your DIY tree. Choose ribbons in different widths, colors, and patterns to create a unique look.
- Glitter: Glitter adds sparkle and shine to DIY trees. Apply glitter to leaves, branches, or the base of the tree to create a festive look.
- Lights: Lights can be used to illuminate your DIY tree and create a warm and inviting ambiance. Choose lights in various colors and styles to match your tree’s theme.
- Ornaments: Ornaments add a touch of personality and charm to your DIY tree. Choose ornaments in various shapes, sizes, and colors to create a unique look.
DIY Tree Projects for Beginners
Creating a DIY tree is a fun and rewarding project for beginners. You can choose from a variety of materials and techniques to create a unique and personalized tree. This section provides a simple DIY tree project suitable for beginners, detailing the steps involved and including visual descriptions.
Simple Paper Tree
This project is perfect for beginners as it requires minimal materials and is easy to assemble. You can use colorful paper or cardstock to create a visually appealing tree.
This project requires the following materials:
- Cardstock or construction paper in various colors
- Scissors
- Glue or tape
- Optional: Markers, crayons, or glitter for decoration
Here are the steps involved in creating a simple paper tree:
- Cut out a rectangular shape from the cardstock or construction paper. This will form the trunk of the tree.
- Fold the rectangular shape in half lengthwise. This will create a crease down the center of the trunk.
- Cut out various leaf shapes from the remaining cardstock or construction paper. You can use different colors and sizes for a more interesting look.
- Fold each leaf in half.
- Glue or tape the leaves to the trunk, starting from the bottom and working your way up. Make sure to overlap the leaves slightly for a fuller look.
- You can decorate the tree with markers, crayons, or glitter.
- Once the glue or tape has dried, your paper tree is ready to be displayed.
You can use different colors and shapes for the leaves, making your tree as unique as you like.
Advanced DIY Tree Techniques
Now that you’ve mastered the basics, it’s time to explore more intricate and visually stunning DIY tree projects. This section will delve into advanced techniques that allow you to create truly unique and elaborate tree masterpieces.
Paper Mache
Paper mache is a versatile technique that can be used to create a wide range of DIY tree projects. It involves layering strips of paper soaked in a paste, typically made from flour and water, to form a solid, sculpted shape. This technique is ideal for creating realistic bark textures and intricate branches.
Here’s a breakdown of the process:
* Prepare the base: Start by creating a basic armature for your tree. You can use wire, foam, or even a balloon as a base.
* Apply the paper mache: Dip strips of newspaper or tissue paper in the paste and carefully layer them onto the armature. Ensure each layer is smooth and overlaps slightly.
* Shape and detail: Once the paper mache has dried, you can shape and detail the tree using a variety of tools, such as a knife, sandpaper, or even your fingers.
* Finishing touches: Once the tree is sculpted to your liking, you can paint it with acrylics, add details with textured paint, or even attach real leaves or flowers.
Example: A classic paper mache tree project is creating a realistic-looking bonsai tree. By carefully layering paper mache onto a wire armature, you can achieve a miniature tree with intricate branches and a textured bark.
Wire Sculpting
Wire sculpting is another excellent technique for creating intricate and delicate DIY trees. This technique involves bending and shaping wire to form the branches and trunk of the tree. Wire sculpting allows for great flexibility and control, making it perfect for creating unique and stylized tree designs.
Here are the steps involved:
* Choose your wire: Select a wire that is strong enough to hold its shape but also flexible enough to bend easily. Aluminum or copper wire are good choices.
* Create the trunk: Start by bending a piece of wire to form the trunk of the tree. You can use a variety of techniques to create different trunk shapes and textures.
* Form the branches: Once the trunk is formed, bend smaller pieces of wire to create the branches. You can use different lengths and thicknesses of wire to create a variety of branch shapes.
* Add details: Once the branches are in place, you can add details to the tree, such as leaves, flowers, or even fruits. These can be made from a variety of materials, including paper, fabric, or even real materials.
Example: A wire-sculpted tree with a stylized, abstract design can be created by using different colored wires to create a unique and eye-catching piece of art. You can bend the wire to create geometric shapes, swirls, or even flowing lines.
Fabric Manipulation
Fabric manipulation offers a unique approach to creating DIY trees. This technique involves using fabric to create the leaves, branches, or even the entire tree. You can use various fabrics, from soft cotton to textured burlap, to create a variety of styles and textures.
Here are some fabric manipulation techniques for DIY trees:
* Fabric draping: Drape fabric over a wire armature to create a flowing and organic tree shape. You can use different colors and textures of fabric to create a unique and layered effect.
* Fabric origami: Fold and shape fabric to create individual leaves or branches. This technique is perfect for creating intricate and delicate tree designs.
* Fabric stitching: Stitch fabric together to create a 3D tree shape. This technique allows for greater control over the form and texture of the tree.
Example: A fabric-draped tree can be created by draping a soft fabric, such as tulle or chiffon, over a wire armature. This technique can create a delicate and ethereal tree, perfect for a whimsical or romantic decor.
DIY Tree Decorating Ideas

Decorating your DIY tree is a fun and creative way to personalize your project and make it truly your own. You can use a variety of materials and techniques to create a unique look that reflects your style and the occasion.
Decorating for Different Occasions
Decorating your DIY tree can be adapted to suit various occasions, adding a personal touch to your celebration. Here are some ideas:
- Holidays: For Christmas, decorate your tree with traditional ornaments, twinkling lights, and festive ribbons. For Halloween, consider using spooky ornaments, spiderwebs, and bats. For Easter, you can use colorful eggs, bunny decorations, and spring flowers.
- Events: For a birthday party, use colorful streamers, balloons, and personalized decorations. For a wedding, consider elegant white or ivory ornaments, delicate lace, and sparkling crystals. For a graduation party, use caps and gowns, diplomas, and celebratory banners.
- Themes: Choose a theme for your tree, such as a specific color scheme, a favorite movie, or a particular hobby. This can help you select the right decorations and create a cohesive look.
Using Decorative Elements
There are many different decorative elements you can use to enhance your DIY tree.
- Lights: String lights can add a warm and inviting glow to your tree, especially during the evening. You can choose from a variety of colors, shapes, and sizes, depending on your preferences.
- Ornaments: Ornaments come in all shapes, sizes, and materials. You can use traditional glass ornaments, handmade paper ornaments, or even repurposed items like bottle caps or buttons.
- Ribbons: Ribbons can add a touch of elegance and color to your tree. You can use them to tie around ornaments, create bows, or simply drape them over the branches.
- Other Decorations: Other decorative elements you can use include fabric scraps, feathers, beads, glitter, and even dried flowers.
Tips for Creating Visually Appealing Decorations
Here are some tips for creating visually appealing decorations for your DIY tree:
- Balance: Aim for a balanced distribution of decorations on your tree. Avoid clustering too many ornaments in one area or leaving other areas bare.
- Color Scheme: Choose a color scheme that complements your tree and the occasion. Consider using a few key colors and incorporating different shades and textures.
- Variety: Use a variety of different decorations to create visual interest. This could include different sizes, shapes, and materials.
- Lighting: Use lighting to enhance the overall effect of your decorations. String lights can create a warm and inviting glow, while spotlights can highlight specific ornaments.
- Personal Touch: Add personal touches to your decorations, such as family photos, handmade ornaments, or mementos. This will make your tree even more special and unique.
DIY Tree for Specific Purposes
DIY trees can be customized for specific purposes, adding a unique touch to various events and spaces. From festive celebrations to home decor, these projects allow you to create a tree that perfectly complements your theme and style.
Christmas Trees
Christmas trees are a classic holiday tradition, and DIY trees offer a fun and personalized alternative to traditional options.
Here are some ideas for crafting unique Christmas trees:
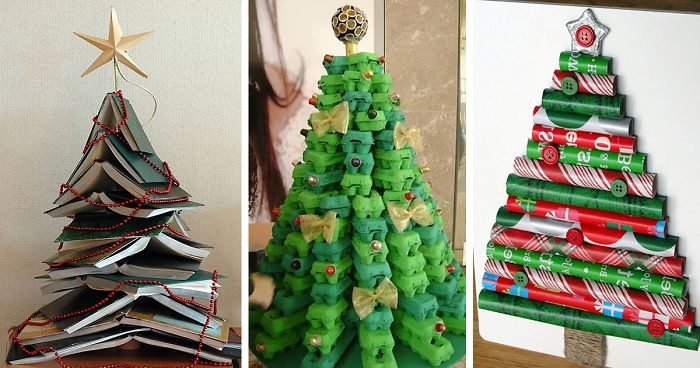
- Upcycled Materials: Use old books, magazines, or even cardboard to create a unique and eco-friendly Christmas tree.
- Natural Elements: Incorporate natural elements like branches, pinecones, and berries for a rustic and charming Christmas tree.
- Paper Crafts: Create a paper Christmas tree using origami techniques or by cutting and assembling paper shapes.
To personalize your Christmas tree, consider using your favorite colors, ornaments, and decorations. You can also add lights for a festive glow.
Wedding Centerpieces
DIY trees can be stunning centerpieces for weddings, adding a touch of elegance and whimsy to the tables.
Here are some tips for crafting wedding centerpiece trees:
- Floral Trees: Use floral foam or a wire frame to create a tree base, and then decorate it with fresh or artificial flowers, creating a vibrant and fragrant centerpiece.
- Rustic Trees: Incorporate natural elements like branches, twigs, and moss to create a rustic and charming centerpiece.
- Crystal Trees: Use crystals or gemstones to create a glamorous and elegant centerpiece.
Choose colors and styles that complement the overall wedding theme, and consider adding candles or other decorative elements for a more dramatic effect.
Home Decor
DIY trees can be a beautiful and unique addition to your home decor.
Here are some ideas for crafting decorative trees:
- Sculptural Trees: Create abstract or realistic tree sculptures using materials like wood, metal, or clay.
- Wall Art Trees: Create a 3D tree design on your wall using paint, stencils, or even fabric.
- Miniature Trees: Create miniature trees using materials like wire, beads, or even recycled materials, perfect for adding a touch of nature to your bookshelf or desk.
Consider your home’s style and color scheme when designing your decorative trees, and choose materials that complement your existing furniture and accessories.
DIY Tree for Different Styles
DIY trees offer a versatile way to add a personal touch to your home decor. Whether you prefer a rustic farmhouse aesthetic, a sleek modern look, or a whimsical touch, you can create a tree that perfectly reflects your style.
Rustic DIY Trees
Rustic DIY trees evoke a sense of warmth and natural beauty. To achieve this style, consider using materials like reclaimed wood, branches, or even driftwood.
- Reclaimed wood: You can use pieces of old wood to create a rustic tree trunk and branches. The natural imperfections and weathering add to the charm of this style.
- Branches: Gather branches from your yard or a local park to create a natural and organic-looking tree.
- Driftwood: Driftwood’s unique shapes and textures make it ideal for creating rustic DIY trees.
Decorate your rustic tree with elements like burlap, twine, dried flowers, or even small birdhouses.
Modern DIY Trees
Modern DIY trees prioritize clean lines and minimalist aesthetics. To achieve this look, consider using materials like metal, acrylic, or even geometric shapes.
- Metal: Metal pipes or rods can be used to create a sleek and modern tree silhouette.
- Acrylic: Acrylic sheets can be cut and shaped to create a contemporary tree design.
- Geometric shapes: Geometric shapes like triangles, squares, or circles can be used to create a modern tree form.
Decorate your modern tree with simple geometric ornaments, metallic accents, or even LED lights.
Whimsical DIY Trees
Whimsical DIY trees are all about fun and creativity. Embrace imagination and experiment with different materials and decorations to create a unique and playful tree.
- Paper: Paper can be used to create a variety of whimsical trees, from origami creations to paper mache masterpieces.
- Yarn: Yarn can be wrapped around a wire frame to create a fluffy and colorful tree.
- Fabric: Fabric scraps can be used to create unique and colorful tree decorations.
Decorate your whimsical tree with playful ornaments, colorful lights, or even miniature fairy figures.
DIY Tree Projects for Kids
Creating DIY trees is a fun and engaging activity for kids of all ages. They can use their creativity to make unique and beautiful trees that they can display in their rooms or give as gifts.
Paper Plate Tree
This is a simple and easy DIY tree project that kids can make with just a few materials.
- Materials: Paper plate, green construction paper, brown construction paper, scissors, glue, crayons or markers
- Instructions:
- Cut out a triangle from the brown construction paper. This will be the trunk of the tree.
- Cut out several leaf shapes from the green construction paper. Make them different sizes and shapes for a more realistic look.
- Glue the trunk to the center of the paper plate.
- Glue the leaf shapes to the paper plate around the trunk.
- Use crayons or markers to add details to the tree, such as lines on the trunk or veins on the leaves.
This project is great for developing fine motor skills and creativity. Kids can experiment with different colors and shapes to create their own unique tree.
Resources and Inspiration for DIY Trees
The world of DIY tree projects is vast and full of possibilities. Whether you’re a seasoned crafter or just starting out, finding the right resources and inspiration is key to creating unique and stunning tree creations. Here’s a guide to help you explore the endless possibilities of DIY trees.
Online Resources for DIY Tree Projects
The internet is a treasure trove of information and inspiration for DIY tree projects. You can find everything from step-by-step tutorials to detailed guides and stunning image galleries.
- Pinterest: Pinterest is a great place to start your search for DIY tree ideas. You can find countless pins with images, tutorials, and inspiration for creating different types of trees. Search for terms like “DIY trees,” “paper trees,” “upcycled trees,” or “miniature trees” to find a wide range of projects.
- YouTube: YouTube is another fantastic resource for DIY tree projects. You can find countless videos showing step-by-step instructions for creating different types of trees. Search for terms like “DIY tree tutorial,” “how to make a paper tree,” or “tree craft ideas” to find a wide range of videos.
- Blogs and Websites: Many blogs and websites are dedicated to DIY projects, including tree crafts. Search for terms like “DIY tree crafts,” “paper crafts,” or “upcycling projects” to find blogs and websites with detailed tutorials and inspiration.
Finding Unique and Creative DIY Tree Ideas
While online resources are invaluable, sometimes you need to think outside the box to find unique and creative DIY tree ideas.
- Nature Inspiration: Look around you! Observe the trees in your neighborhood or local park. Notice their shapes, textures, and colors. Let nature inspire your own unique tree creations.
- Upcycling and Repurposing: Look for materials that can be upcycled or repurposed into tree-like structures. Old branches, cardboard tubes, plastic bottles, and even fabric scraps can be transformed into unique and creative tree creations.
- Combining Materials: Don’t be afraid to experiment with different materials. Combine paper, fabric, wood, metal, and other materials to create unique and textured tree creations.
Conclusive Thoughts
The world of DIY trees offers endless possibilities for creativity and expression. From simple beginner projects to elaborate works of art, there’s a DIY tree for every skill level and occasion. So, gather your materials, embrace your inner artist, and embark on a journey of crafting your own unique and beautiful trees. The possibilities are as limitless as your imagination.
DIY tree projects can be incredibly rewarding, allowing you to personalize your space with unique creations. Whether you’re crafting a miniature bonsai or a towering centerpiece, adding a touch of handmade charm can elevate your decor. For a bit of extra flair, consider incorporating some handcrafted accessories, such as homemade earrings , to complement your DIY tree and create a cohesive aesthetic.


