cPanel Website is a powerful web hosting control panel that empowers users to manage their websites with ease. It offers a user-friendly interface and a wide range of features that streamline website administration, making it an indispensable tool for both novice and experienced webmasters.
From creating email accounts and managing files to optimizing website performance and ensuring security, cPanel provides a centralized platform for all aspects of website management. Its intuitive design and comprehensive functionality make it a popular choice for web hosting providers worldwide.
What is cPanel?
cPanel is a web hosting control panel that provides a user-friendly interface for managing your website and hosting account. It simplifies various tasks related to your website, making it easier to manage your website even if you don’t have technical expertise.
cPanel Functions for Website Management
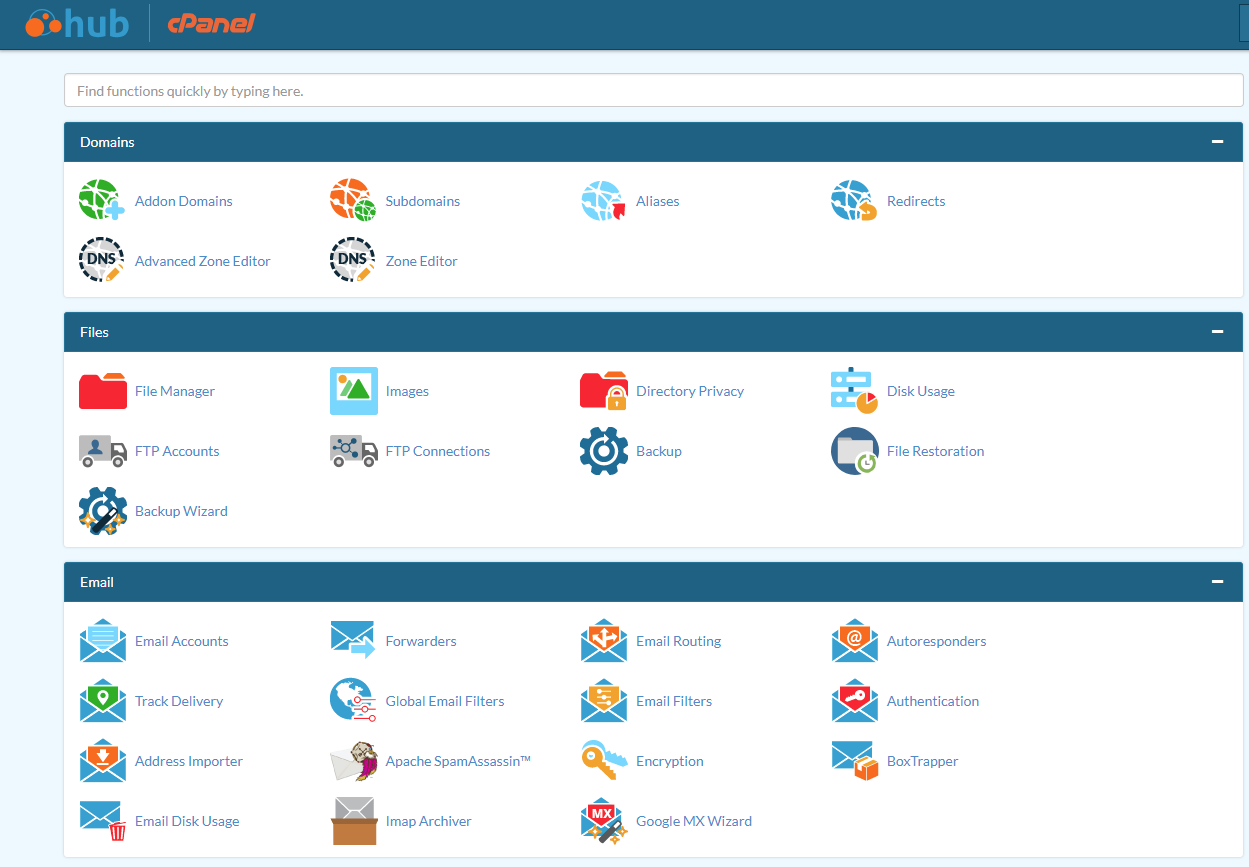
cPanel offers a comprehensive set of tools to manage your website. These tools are organized into different sections, each focusing on specific aspects of website management.
- Website Files: cPanel allows you to access and manage the files that make up your website. You can upload, download, edit, and delete files using the File Manager. This enables you to update website content, add new files, or troubleshoot issues related to website files.
- Email Accounts: cPanel makes it easy to create, manage, and access email accounts associated with your domain. You can set up new email addresses, manage email filters, and access your email through the webmail interface.
- Databases: cPanel provides tools for managing databases, which are essential for storing website data like user information, blog posts, and product details. You can create, modify, and manage databases through the MySQL database manager.
- Security: cPanel offers various security features to protect your website from threats. These features include password protection for directories, security scans, and the ability to block malicious IP addresses.
- Website Performance: cPanel provides tools to optimize your website’s performance. You can manage website traffic, track website statistics, and configure caching settings to improve loading speeds.
Examples of Tasks Accomplished Using cPanel
- Uploading website content: Using the File Manager, you can easily upload website files, such as images, HTML pages, and CSS files, to your website.
- Creating email accounts: cPanel allows you to create new email accounts for your domain, enabling you to set up email addresses for your team, customers, or other purposes.
- Managing website security: cPanel’s security features allow you to protect your website from malicious attacks by implementing password protection for directories, blocking suspicious IP addresses, and conducting security scans.
- Monitoring website traffic: cPanel provides website statistics that allow you to track visitor activity, understand website traffic patterns, and identify areas for improvement.
Benefits of Using cPanel
cPanel is a widely used web hosting control panel that simplifies website management tasks for users of all technical levels. It provides a user-friendly interface with a wide range of features, making it a popular choice for web hosting providers and their customers.
Ease of Use and User-Friendly Interface
cPanel’s intuitive interface simplifies website management tasks, making it accessible to users with varying technical expertise. The control panel is organized into clear sections, with each section containing tools related to specific website functions. This makes it easy for users to navigate and find the tools they need, even if they are not familiar with web hosting.
Comprehensive Feature Set
cPanel offers a comprehensive set of features that cover all aspects of website management, including:
- File Management: cPanel allows users to upload, download, and manage files on their website, making it easy to create, edit, and update website content.
- Email Management: cPanel provides tools for creating and managing email accounts, setting up email forwarding, and configuring spam filters.
- Database Management: cPanel allows users to create, manage, and access databases, which are essential for storing website data.
- Security Features: cPanel includes security features such as firewall protection, malware scanning, and SSL certificate management, helping users protect their websites from threats.
- Website Performance Optimization: cPanel provides tools for optimizing website performance, including caching, compression, and image optimization.
- Domain Management: cPanel allows users to manage their domains, including adding, removing, and updating domain names.
- Website Backup and Restoration: cPanel offers backup and restoration tools to protect website data and ensure easy recovery in case of data loss.
Comparison with Other Control Panels
cPanel is one of the most popular website control panels, but it is not the only option available. Other popular control panels include:
- Plesk: Plesk is a popular alternative to cPanel, offering a similar range of features and a user-friendly interface. Plesk is known for its strong security features and its ability to manage multiple websites from a single dashboard.
- DirectAdmin: DirectAdmin is a lightweight control panel that is known for its ease of use and its focus on performance. DirectAdmin is a good option for users who need a simple and efficient control panel.
- cPanel vs. Plesk vs. DirectAdmin: cPanel is generally considered the most user-friendly option, while Plesk offers more advanced features and stronger security. DirectAdmin is a lightweight option that is suitable for smaller websites.
Scenarios Where cPanel Excels
cPanel is particularly beneficial in the following scenarios:
- Shared Hosting Environments: cPanel is commonly used in shared hosting environments, where multiple websites share the same server resources. It provides a convenient way for users to manage their individual websites without interfering with other users.
- Web Hosting Providers: cPanel is a popular choice for web hosting providers due to its ease of use and its comprehensive feature set. It allows providers to offer a wide range of services to their customers, including email, databases, and website security.
- Users with Limited Technical Expertise: cPanel’s user-friendly interface makes it a good choice for users who are not familiar with web hosting. The control panel’s intuitive design and clear instructions allow users to easily manage their websites without requiring extensive technical knowledge.
How to Access and Navigate cPanel
Accessing and navigating cPanel is straightforward, requiring just a few steps and understanding its intuitive interface. Once you have access to your cPanel account, you can manage various aspects of your website, including email, databases, files, and security settings.
Accessing cPanel, Cpanel website
Accessing cPanel is typically done through your web hosting provider’s website. The exact process may vary slightly depending on your provider, but generally involves the following steps:
- Log in to your web hosting account: Visit your hosting provider’s website and log in using your account credentials. This will usually take you to a control panel where you can access your cPanel.
- Locate the cPanel link: The cPanel link is usually found in a dedicated section within your hosting control panel. It may be labeled as “cPanel,” “Control Panel,” or something similar. Look for a link or button that leads to the cPanel interface.
- Click the link: Once you locate the cPanel link, click on it. This will redirect you to your cPanel dashboard.
Navigating cPanel
The cPanel interface is designed to be user-friendly and organized into sections. Here’s a brief overview of the common navigation elements:
- Dashboard: The cPanel dashboard provides a quick overview of your account’s key features and information. It may include statistics, recent activity, and links to essential services.
- Search Bar: The search bar located at the top of the cPanel interface allows you to quickly find specific features or settings. Simply type in the name of the feature you’re looking for, and cPanel will display matching results.
- Navigation Menu: The left-hand side of the cPanel interface typically contains a navigation menu. This menu is organized into categories, such as “Files,” “Databases,” “Email,” and “Security.” Each category contains a list of related features and settings.
- Icons and Buttons: Within each section of cPanel, you’ll find icons and buttons that represent different features or actions. Hovering over these icons or buttons will usually display a tooltip explaining their purpose.
Locating Specific Features
Finding specific features within cPanel is relatively easy, thanks to its well-structured interface and search functionality.
- Use the Search Bar: The search bar is the most efficient way to locate specific features. Simply type in the name of the feature you’re looking for, and cPanel will display matching results. This saves time and effort compared to navigating through the menu.
- Browse the Navigation Menu: If you know the general category where the feature is located, browse the navigation menu on the left-hand side. Click on the relevant category to expand it and see a list of available features.
- Utilize Tooltips: Hover over icons and buttons within cPanel to display tooltips that provide brief explanations of their functions. This can help you identify the correct feature or action.
Setting Up a Website with cPanel: Cpanel Website
cPanel provides a user-friendly interface to manage your website. This includes setting up your website, managing files, configuring databases, and more.
Creating a New Website
cPanel makes it easy to create a new website. The process typically involves the following steps:
- Choose a domain name: This is the address that people will use to access your website. You can register a new domain name or use an existing one.
- Create a hosting account: You will need a hosting account to store your website files. cPanel offers a variety of hosting plans to choose from.
- Access your cPanel dashboard: Once you have a hosting account, you will be able to access your cPanel dashboard. This is where you will manage all aspects of your website.
- Create a website directory: cPanel allows you to create a dedicated directory for your website files. This keeps your website organized and separate from other files on your hosting account.
- Upload your website files: You can upload your website files to your cPanel directory using a variety of methods, such as FTP, SFTP, or a file manager.
- Configure your domain name: You need to configure your domain name to point to your hosting account. This involves setting up DNS records to ensure that visitors can access your website.
Configuring Domain Names
Domain names are essential for website accessibility. cPanel allows you to manage your domain names efficiently.
- Add a domain name: You can add a new domain name to your cPanel account, which is crucial for hosting multiple websites.
- Manage DNS records: cPanel provides tools to manage DNS records for your domain name. DNS records tell browsers how to find your website’s server.
- Set up email accounts: You can create email accounts associated with your domain name. This allows you to send and receive emails using your domain name.
Configuring FTP Access
FTP (File Transfer Protocol) is used to transfer files between your computer and your website’s server. cPanel offers a secure FTP environment.
- Create FTP accounts: You can create FTP accounts for yourself or other users, allowing them to access your website files.
- Set permissions: You can set permissions for FTP accounts, controlling which files users can access and modify.
- Manage FTP connections: cPanel provides tools to monitor and manage FTP connections, ensuring secure file transfers.
Configuring Email Accounts
Email accounts are vital for communication and website functionality. cPanel provides a comprehensive email management system.
- Create email accounts: You can create email accounts for your website, using your domain name.
- Set up email forwarding: You can configure email forwarding, redirecting emails from one address to another.
- Manage email filters: cPanel allows you to set up email filters, blocking spam and managing email delivery.
- Access webmail: cPanel offers a webmail interface, allowing you to access your email accounts from any web browser.
Installing a Content Management System (CMS)
CMSs simplify website management by providing a user-friendly interface for creating and updating content.
- Install a CMS: cPanel often includes a “Softaculous” application installer, which offers a wide range of CMSs, including WordPress, Joomla, and Drupal.
- Choose a CMS: Select the CMS that best suits your needs and website requirements.
- Configure CMS settings: After installing the CMS, you can configure settings like database connection, themes, and plugins.
Managing Email Accounts in cPanel
cPanel provides a comprehensive suite of tools for managing email accounts, making it easy to create, modify, and delete accounts, set up email forwarding, autoresponders, and filters. These features allow you to manage your email communication efficiently and effectively.
Creating Email Accounts
Creating new email accounts in cPanel is straightforward. You can create accounts for yourself, your team members, or clients, enabling them to send and receive emails using your domain name.
- Login to your cPanel account.
- Navigate to the “Email Accounts” section.
- Click on the “Create” button to open the account creation form.
- Enter the desired username, password, and email address for the new account.
- Click on the “Create” button to complete the process.
Modifying Email Accounts
Once you’ve created an email account, you can easily modify its settings, such as changing the password, setting a quota, or enabling/disabling specific features.
- Login to your cPanel account.
- Navigate to the “Email Accounts” section.
- Select the email account you want to modify.
- You’ll see various options to change the password, quota, and other settings.
Deleting Email Accounts
If you no longer need an email account, you can delete it from your cPanel.
- Login to your cPanel account.
- Navigate to the “Email Accounts” section.
- Select the email account you want to delete.
- Click on the “Delete” button to remove the account.
Setting Up Email Forwarding
Email forwarding allows you to redirect incoming emails to a different address. This can be useful for sending all emails to your personal account, for example.
- Login to your cPanel account.
- Navigate to the “Email Forwarders” section.
- Click on the “Add Forwarder” button.
- Enter the email address you want to forward from and the address you want to forward to.
- Click on the “Add Forwarder” button to save the settings.
Setting Up Autoresponders
Autoresponders, also known as email replies, are automated messages sent in response to incoming emails. They are useful for acknowledging messages, providing information, or notifying senders about your absence.
- Login to your cPanel account.
- Navigate to the “Autoresponders” section.
- Select the email account you want to set up an autoresponder for.
- Enter the subject and message of the autoresponder.
- You can also set the start and end dates for the autoresponder to be active.
- Click on the “Create” button to save the settings.
Setting Up Email Filters
Email filters allow you to automatically sort and manage incoming emails based on specific criteria. You can use filters to block spam, forward emails to specific folders, or take other actions.
- Login to your cPanel account.
- Navigate to the “Email Filters” section.
- Click on the “Add Filter” button.
- Enter a name for the filter and define the criteria, such as the sender’s address or subject line.
- Select the action you want to take when the filter is triggered, such as moving the email to a specific folder or deleting it.
- Click on the “Create” button to save the settings.
File Management with cPanel
cPanel’s File Manager is a powerful tool that allows you to manage the files and folders on your website. It offers a user-friendly interface that simplifies common file management tasks, making it easy to keep your website’s content organized and up-to-date.
Uploading Files
Uploading files to your website is a fundamental aspect of web development. The File Manager in cPanel simplifies this process.
- Navigate to the File Manager: Log in to your cPanel account and locate the “File Manager” icon.
- Select the Destination Folder: Choose the specific directory where you want to upload your files. You can navigate through the folder structure using the left-hand pane.
- Use the “Upload” Button: Click the “Upload” button at the top of the File Manager window.
- Select Files: Browse your local computer to choose the files you want to upload.
- Confirm Upload: Click the “Upload” button again to initiate the file transfer.
Downloading Files
Downloading files from your website is essential for retrieving backups, accessing website assets, or transferring files to another location. cPanel’s File Manager streamlines this process.
- Locate the File: Navigate to the directory where the file you want to download is located.
- Select the File: Click the checkbox next to the file name to select it.
- Download Option: Look for the “Download” button or icon, usually located in the toolbar above the file list.
- Confirm Download: Click the “Download” button to initiate the file transfer to your local computer.
Editing Files
Editing files directly within the File Manager can be useful for making minor changes to website content or configuration files.
- Locate the File: Navigate to the directory containing the file you want to edit.
- Select the File: Click the checkbox next to the file name.
- Open in Editor: Look for the “Edit” button or icon, usually located in the toolbar above the file list.
- Make Changes: Use the built-in editor to modify the file content.
- Save Changes: Click the “Save Changes” button to apply the edits.
Deleting Files
Deleting files from your website is a necessary task for removing unwanted content or managing storage space.
- Locate the File: Navigate to the directory containing the file you want to delete.
- Select the File: Click the checkbox next to the file name.
- Delete Option: Look for the “Delete” button or icon, usually located in the toolbar above the file list.
- Confirm Deletion: cPanel may prompt you to confirm the deletion. Click the “Delete” button to proceed.
Managing Website Files and Folders
cPanel’s File Manager offers a comprehensive set of features for managing website files and folders, including:
- Creating Folders: Use the “New Folder” button to create new directories for organizing your website files.
- Renaming Files and Folders: Right-click on a file or folder and select “Rename” to change its name.
- Moving Files and Folders: Drag and drop files or folders to move them between directories.
- Permissions: Adjust file and folder permissions to control access and security.
Database Management in cPanel
cPanel offers a user-friendly interface for managing databases, a crucial aspect of website functionality. Databases store and organize information used by your website, such as user data, product listings, or blog posts.
Database Types
cPanel primarily supports MySQL databases, the most popular choice for web applications. MySQL is a robust and reliable database management system known for its scalability and performance.
Creating Databases
To create a new database, follow these steps:
- Log in to your cPanel account.
- Navigate to the “Databases” section.
- Click on the “MySQL Databases” icon.
- Enter a unique name for your database and click “Create Database.”
Modifying Databases
Once a database is created, you can modify its settings:
- Change the database name.
- Set a password for the database.
- Manage user permissions for accessing the database.
Deleting Databases
To delete a database:
- Navigate to the “MySQL Databases” section.
- Select the database you want to delete.
- Click the “Delete” button.
Accessing and Managing Database Content
cPanel provides tools for interacting with databases:
- phpMyAdmin: A web-based interface for managing MySQL databases. It allows you to create, modify, and delete tables, insert, update, and delete data, and execute SQL queries.
- Remote Database Access: You can connect to your database using a database client application, such as MySQL Workbench or phpMyAdmin, from your local computer. This gives you more control and flexibility in managing your database.
Security Measures in cPanel
cPanel provides a robust set of security features designed to safeguard your websites and data from potential threats. These features encompass various aspects, including malware protection, access control, and system hardening. By utilizing these tools effectively, you can significantly reduce the risk of unauthorized access, data breaches, and website compromise.
Malware Protection
Malware protection is crucial for preventing malicious software from infiltrating your website and potentially causing harm. cPanel offers several tools to address this threat.
- Antivirus Scanning: cPanel’s built-in antivirus scanner regularly checks your website files for known malware signatures. It identifies and removes infected files, helping to prevent the spread of malware.
- Website Firewall: cPanel’s firewall acts as a barrier between your website and the outside world, blocking malicious traffic and attempts to exploit vulnerabilities. This helps to protect your website from common attacks such as SQL injection and cross-site scripting.
- Security Monitoring: cPanel provides tools to monitor your website for suspicious activity, such as unusual file changes or login attempts. This helps you detect potential threats early and take appropriate action.
Access Control
Managing user permissions and access levels is essential for maintaining the security of your cPanel account.
- User Accounts: cPanel allows you to create multiple user accounts with varying levels of access. This enables you to grant specific permissions to different individuals, ensuring that only authorized personnel have access to sensitive data and settings.
- Password Policies: cPanel enables you to enforce strong password policies for all user accounts. This includes requirements for password complexity, length, and regular changes.
- Two-Factor Authentication: cPanel supports two-factor authentication, adding an extra layer of security by requiring users to provide a second authentication factor, such as a code from a mobile app, in addition to their password.
Security Settings
cPanel offers a range of security settings that can be configured to enhance the protection of your website.
- Security Center: The Security Center provides a centralized location for managing various security settings. You can configure firewall rules, scan for vulnerabilities, and manage security-related tasks.
- SSL/TLS Certificates: cPanel allows you to install and manage SSL/TLS certificates, which encrypt communication between your website and visitors, ensuring secure data transmission.
- IP Address Blocking: You can block specific IP addresses from accessing your website to prevent malicious activity or spam.
- File Permissions: cPanel allows you to set appropriate file permissions, ensuring that only authorized users have access to specific files and directories.
Best Practices for Security
- Keep Software Updated: Regularly update your cPanel, web server software, and plugins to patch vulnerabilities and protect against known exploits.
- Use Strong Passwords: Create strong passwords that are difficult to guess and use unique passwords for different accounts.
- Backup Your Data: Regularly back up your website data and files to ensure that you can restore them in case of a security incident.
- Monitor Security Logs: Regularly review security logs to identify suspicious activity and take appropriate action.
- Educate Yourself: Stay informed about the latest security threats and best practices to protect your website.
Website Performance Optimization with cPanel
![]()
A fast and responsive website is crucial for a positive user experience and improved search engine rankings. cPanel offers a variety of tools and features to help you optimize your website’s performance, ensuring your visitors have a smooth and enjoyable experience.
Analyzing Website Traffic
Understanding your website’s traffic patterns is essential for identifying performance bottlenecks. cPanel provides tools to analyze website traffic, allowing you to identify pages with slow loading times, high bounce rates, and other performance issues.
- Website Statistics: The “Website Statistics” section in cPanel provides detailed information about your website’s traffic, including page views, unique visitors, and top referring websites. This data can help you identify popular pages and areas for improvement.
- Error Logs: cPanel’s error logs can help you pinpoint specific issues that may be affecting website performance. For instance, if you see frequent 404 errors, it might indicate broken links that need to be fixed.
Caching and Compression
Caching and compression are essential techniques for reducing website load times. cPanel offers features that enable you to implement these optimizations.
- Caching: Caching stores frequently accessed website content on a server, reducing the need to fetch data from the database every time a user visits the page. cPanel’s “Caching” section provides options for configuring various caching methods, including page caching, object caching, and opcode caching.
- Compression: Compressing website files, such as HTML, CSS, and JavaScript, can significantly reduce the amount of data transferred to users’ browsers. cPanel’s “Compression” feature enables you to configure GZIP compression, which compresses files before sending them to the browser, resulting in faster loading times.
Optimizing Images
Images are often the largest files on a website, significantly impacting load times. cPanel offers tools for optimizing images, reducing their file size without compromising quality.
- Image Optimization: cPanel’s “Image Optimization” feature allows you to automatically optimize images uploaded to your website. This feature can reduce image file sizes by up to 80% without noticeable quality loss, leading to faster page loading times.
Other Performance Optimization Techniques
In addition to caching, compression, and image optimization, cPanel offers other features to improve website performance.
- Website Optimization: cPanel’s “Website Optimization” section provides tools for analyzing website code and identifying potential performance issues. It suggests specific improvements to optimize your website’s structure, code, and content.
- PHP Settings: Optimizing PHP settings can significantly impact website performance. cPanel allows you to adjust PHP configuration options, such as memory limits, execution time limits, and error reporting levels, to enhance performance.
Final Wrap-Up
Whether you’re a seasoned web developer or just starting your online journey, cPanel Website is an invaluable resource for managing your website effectively. Its user-friendly interface, robust features, and comprehensive support make it a reliable and efficient solution for all your web hosting needs. By understanding the basics of cPanel, you can unlock the full potential of your website and achieve your online goals.

